Hey hey all you lazy bones crocheters out there. The reasons why I choose each project to crochet are quite varied but this one was selected out of sheer laziness. We were sitting down at home to watch a film and the urge to crochet came upon me. I looked at the pile of yarn that was still next to me from my last project (Sunkern) and did a quick search through my Ravelry queue to see what I could make with the same colours that meant I didn’t have to get up. Chikorita fit the bill perfectly, so off I went.
Chikorita is one of my tiniest Pokemon – even smaller than my Sunkern and Porg
Soon into the pattern it became abundantly clear that this was a very small pattern – tinier than I usually prefer to make for my Pokemon. On the plus side, it meant that Chikorita came into being very quickly, and the bulk was done by the end of the movie.
Hey hey spring chickens! I hope the past month has been good to you. The beginning of spring has been a rollercoaster of sunshine and snow here but the flowers of the season are resilient and have poked their way out into the sun. Inspired by the budding spring, I chose Sunkern for my next Pokemon project and it’s quickly become one of my favourites.
Little Sunkern is a total sun seeker
I couldn’t find the wire I normally use for posability so to give Sunkern’s stem a bit more structure I used a reed from a reed diffuser, which certainly does the trick.
Hey hey crochet lovers. I seem inexorably drawn to grass and water type Pokemon – maybe that comes from living in the damp and green North West of England, or maybe I just like anything blue. Lotad is one of my favourites at the moment, perhaps because it spans grass and water types but also because its lily pad sombrero is just so darned cute.
Lotad in flatpack mode
This was a pretty simple make and only took a few evenings to pull together from start to finish. The most complicated part is the lily pad, which is made from two separate layers crocheted together. It helps if you get the layers to be the same size – my openings at the back didn’t quite match up – but a creative bit of tucking and it worked out fine.
Lotad’s lily pad is two layers sandwiched together
The pattern suggests using a piece of card or plastic to give the pad some additional stability but in the cotton yarn I used this wasn’t really necessary, so mine is all yarn. Rather than crochet the dark green details on top, I turned to needle felting, which worked out great.
Lotad in all his glory
Pattern:
Yarn: Blue Sirdar cotton DK, green Wendy cotton DK, yellow Rico Essentials cotton DK
Hey hey crochet lovers. I hope your 2018 is getting off to a good start. I’m keeping up with my creative resolution so far and this has been a busy week of crafting – assembling a new display shelf counts, doesn’t it?
Part one of the Solar System blanket CAL is underway
Before Christmas I signed up to the new Solar System Blanket CAL by Two Hearts Crochet, and the first part of the pattern dropped this week. This is a bit different to most crochet-alongs, with its geeky theme and in-the-round construction – both of which suit me down to the ground. I’ve made a good start on the first part, and with a weekly release schedule on new sections, I don’t want to fall behind!
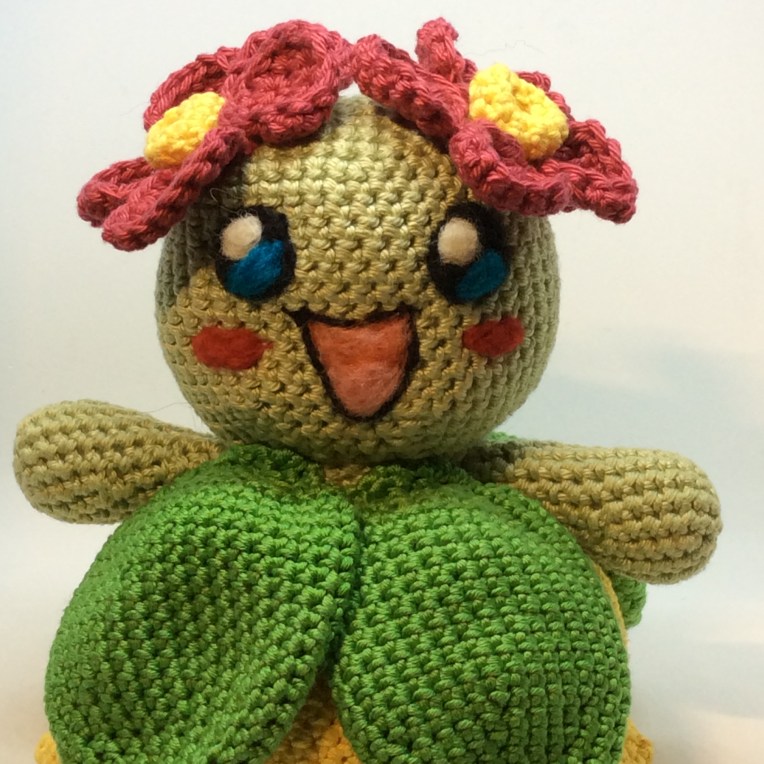
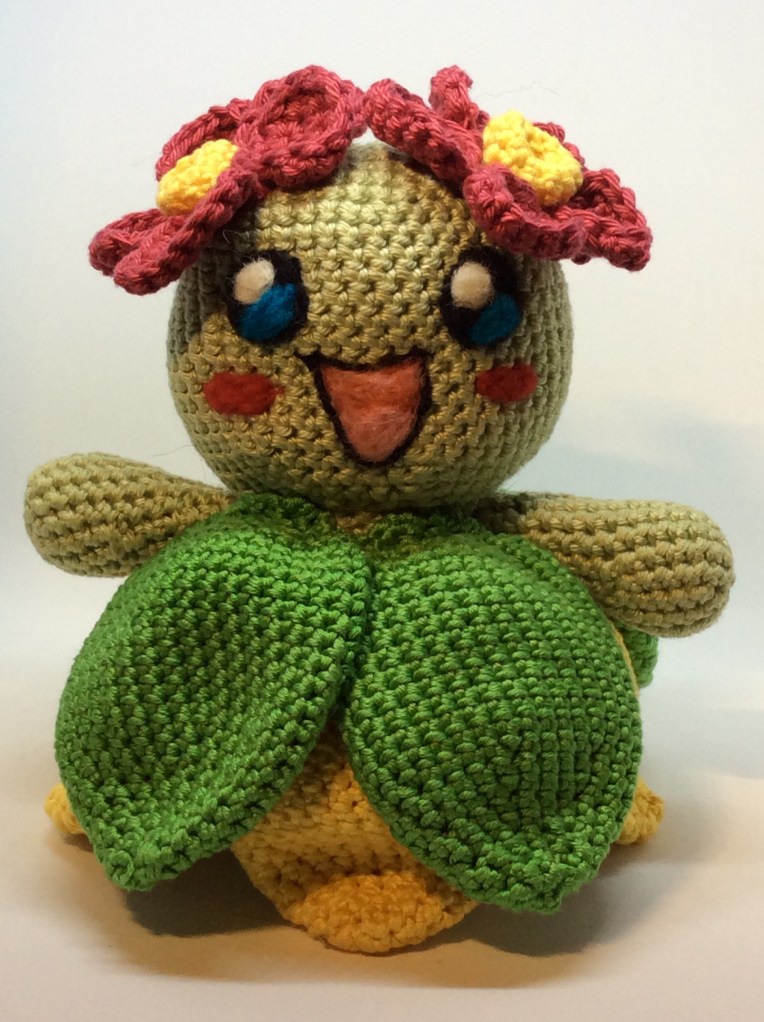
Bellossom is a joyful little creature
My ticked off, completed project of the week is an adorable Bellossom Pokemon I started on New Year’s Day. The pattern for this doll is from Sabrina Somers, who also designed the Hoppip and Pikachu patterns I have made previously. I think her patterns are excellent as they’ve got a great cuddly feel to them and represent the intended Pokemon very accurately – a key criteria for me.
Bellossom in all her beauty
There are quite a few elements to this one with all the leaves and petals, but none of those elements are very complex, so it’s an easy enough pattern for someone with a couple of Amigurumi under their belt.
Hey hey crochet lovers. I’m so far behind with my blog posts that I still haven’t shared some of the critters I crocheted back in March, let alone what I’m up to now! I’m determined to get bang up to date though, so first step on the journey is to introduce you to the pink delight that is Hoppip.
This second-generation grass type was a delight to make a delight to look at too. Any Pokemon with a largely circular body tends to whip together pretty well, and Hoppip was no exception. The only more complicated aspect here was introducing some wire to his helicopter leaf blades to make them extra perky. A little bit of twisted jewellery wire did the job but it does make this one unsuitable for kids.
If you are new to crochet or want to get started making crocheted Pokemon then I would recommend Sabrina Somers’ patterns. I’ve done a few now and they’ve all been easy to follow and true to the look and dimensions of their intended monsters.
Hey hey crochet lovers. I’ve been busy making lots of new Pokemon over the past few months and I have quite the backlog to get online. This little fella has jumped the queue though, as it’s my very first original design and I couldn’t wait to share it online.
After brushing up my amigurumi skills on some of the excellent patterns out there I felt I knew enough to tackle this fairly simple design. The main body is a sphere and each of the vines is essentially a tight blue tube. There’s nothing too tricky to crochet but getting the right look from the vines can be more challenging, and it’s more art than science. I like to needle-felt features, so that’s what I’ve done here, but you could equally crochet some simple white circles with a small black centre if you prefer.
Tangela pattern
All elements were crocheted using a 3.5mm hook and DK yarn to create a Pokemon approximately 20cm high. You’ll need black, red and denim blue yarn plus white and black fibres for needle-felting.
Main body (make 1 in black)
Rnd 1: 8 sc in Magic Ring (8)
Rnd 2: 2 sc in each sc around (16)
Rnd 3: sc in next sc, 2 sc in next sc around (24)
Rnd 4: sc in next 2 sc, 2 sc in next sc around (32)
Rnd 5: sc in next 3 sc, 2 sc in next sc around (40)
Rnd 6: sc in next 4 sc, 2 sc in next sc around (48)
Rnd 7: sc in next 5 sc, 2 sc in next sc around (56)
Rnd 8: sc in next 6 sc, 2 sc in next sc around (62)
Rnd 9-16: sc in each sc around (62)
Rnd 17: sc in next 6 sc, dec over next 2 sc around (56)
Rnd 18: sc in next 5 sc, dec over next 2sc around (48)
Rnd 19: sc next 4 sc, dec over next 2 sc around (40)
Rnd 20: sc next 3 sc, dec over next 2 sc around (32)
Rnd 21: sc next 2 sc, dec over next 2 sc around (24)
Rnd 22: sc next sc, dec over next 2 sc around (16)
Rnd 23: dec over next 2 sc around (8)
Vines (make 20 in blue)
6 sc in a magic ring (6)
sc in next 6 sc
Continue round until vine is around 30cm long
Feet (make 2 in red)
6 sc in a magic ring (6)
Rnd 2: 2sc in each stitch (12)
Rnd 3-15: sc in each stitch (12)
Lightly stuff
Rnd 16: Dec over next 2sc around (6)
Needle-felting the eyes
1) Start by teasing out some white fibres and coiling them into a flat coin shape.
2) Poke with a needle until the fibres fuse and start to form a flat circle. Tease any loose fibres in from the outside to get a crisp edge.
3) Repeat for the second eye until you have two equally sized circles.
4) Take a small amount of black fibres, coil them tightly and place in the centre of the first eye. Use the needle to fuse the fibres into a tight pupil in the centre of the eye.
5) Repeat for the second pupil to complete the look.
Attaching the vines
The most challenging part of this Pokemon is attaching all the vines and tangling them in a pleasing way. I started by attaching a ring of five vines around the top of the body and one just below the right eye for authenticity. Continue by attaching more vines in rings at different heights.
I found it helps to tangle as you go, especially around the face, to make sure you get good coverage. Try to keep the coverage even. If you find its still a bit patchy, you may need a few more vines. Good luck!